
1
General information

2
Technical information
3
Safety information
4
Storage information
5
Information regarding discharge of liquids
6
Information for replacing the functional units
7
Information for disassembly
8
Information about overhauling
9
Assembly information
10
Fluids filling information
11
Information about optional components
12
Information on adjustments
13
Tools information
14
Information about failures
15
Glossary

SCR sensor replacement (SCR VERSIONS ONLY)
|
|
|
|
6.15.1 SCR-T
6.15.1.1 Disassembly 1 - Disengage connector A.
2 - Unscrew and remove SCR-T sensor B.
6.15.1.2 Assembly
1 - Screw SCR-T sensor B on SCR C.
2 - Tighten SCR-T sensor B to SCR C (tightening torque of 45 Nm).
3 - Fit connector A to SCR-T sensor B. |
Fig. 6.76 |
|
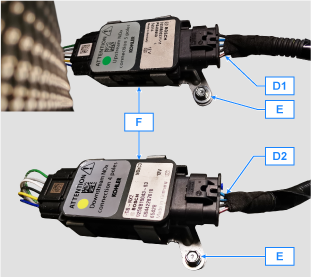
6.15.2 NOx
6.15.2.1 Disassembly
1 - Disengage connectors D1 and D2.
2 - Loosen screws E and remove SCUs F.
3 - Loosen and remove NOx sensors G from SCR C.
6.15.2.2 Assembly
1 - Screw NOx sensor G on SCR C.
2 - Tighten NOx sensors G to SCR C (tightening torque of 60 Nm).
3 - Fasten SCUs F with screws E (tightening torque of 3 Nm).
4 - Fit connector D1 and D2 as described in the connection plates (D1 > Upstream = 5-pin connector | D2 > SCR Downstream = 4-pin connector). |
Fig. 6.77
Fig. 6.78
Fig.6.79 |
 Warning
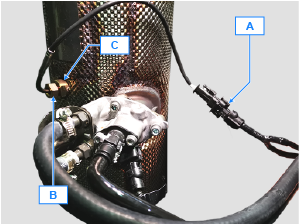


 Loading